If you’re looking for an apple pie recipe that will make everyone at your table gasp with delight, this is it! The filling is effortless and ridiculously tasty. Seriously, I’ve baked this pie more times than I can keep track of, and it’s the only recipe I always come back to when I want a cozy dessert that really wows. Pair it with my buttery homemade pie crust, and you’ll never go back to store-bought apple pie again. #forserious
“I’ve been making this pie once or twice a year since the recipe came out, and it’s been a hit each and every time! Compliments have included “smells like childhood,” “the best pie I’ve ever had,” and “better than my grandma’s,” so you KNOW it’s something special! Generally I use a mix of Honeycrisp and Golden Delicious Apples, with maybe a Granny Smith or two.”
Rose
From-Scratch Homemade Apple Pie
A good apple pie is all about balance, and that begins with the crust. I use my 3 ingredient pie crust recipe, which is a hybrid between a mealy and flaky crust. It stays firm enough to stand up to the juicy apple filling (no soggy bottom!) while still baking into buttery, flaky layers.
The filling in this recipe gets an upgrade from your regular store-bought pie, too, since I don’t just toss the apples with sugar and spices and call it a day. I reduce the apple juices into a quick caramel, then stir the apple slices back in until they’re glossy and just softened. It’s one of those small steps that make this homemade apple pie taste truly unforgettable.
Recipe Success Tips
- Use the right apples! I divide the apple display at my grocery store into two sections: great for pie and awful for pie. Apples that are great for pie hold their shape during baking and have complex flavors. I recommend using a combination of Honey Crisp, Granny Smith, Pink Lady, or Golden Delicious. AVOID McIntosh, Fuji, Gala, or Red Delicious for apple pie as they taste one-dimensional and fall apart faster than a reality show housewife (use them to make applesauce instead!) 😉
- This recipe is for a standard pie pan with a volume of 4 cups. But since apples shrink by about 30% of their volume as they bake, you need more fruit than you’d think. I use 6 cups of sliced apples for the filling, which is usually 6 to 8 apples. You may need more or fewer apples depending on their size.
- Slice your apples about 1/4-1/2 inch thick. Any thicker, and they won’t cook through by the time your crust does. Any thinner, and they’ll dissolve and leave you with a soggy bottom crust. Make sure to slice them the same thickness so they cook uniformly!
- Keep the pie crust ingredients COLD! If you’re making my homemade crust (which I highly recommend), you need to keep everything cold. I put all my ingredients and tools in the freezer, and keep individual ingredients chilled when I’m not using them.

Apple Pie
Equipment
-
Large Bowl
-
Box Grater
-
Plastic Wrap
-
2 Sheet Trays (or one pizza stone)
-
Rolling Pin
-
Colander
-
Large Sauce Pan
-
9'' Pie Dish (4 cup capacity)
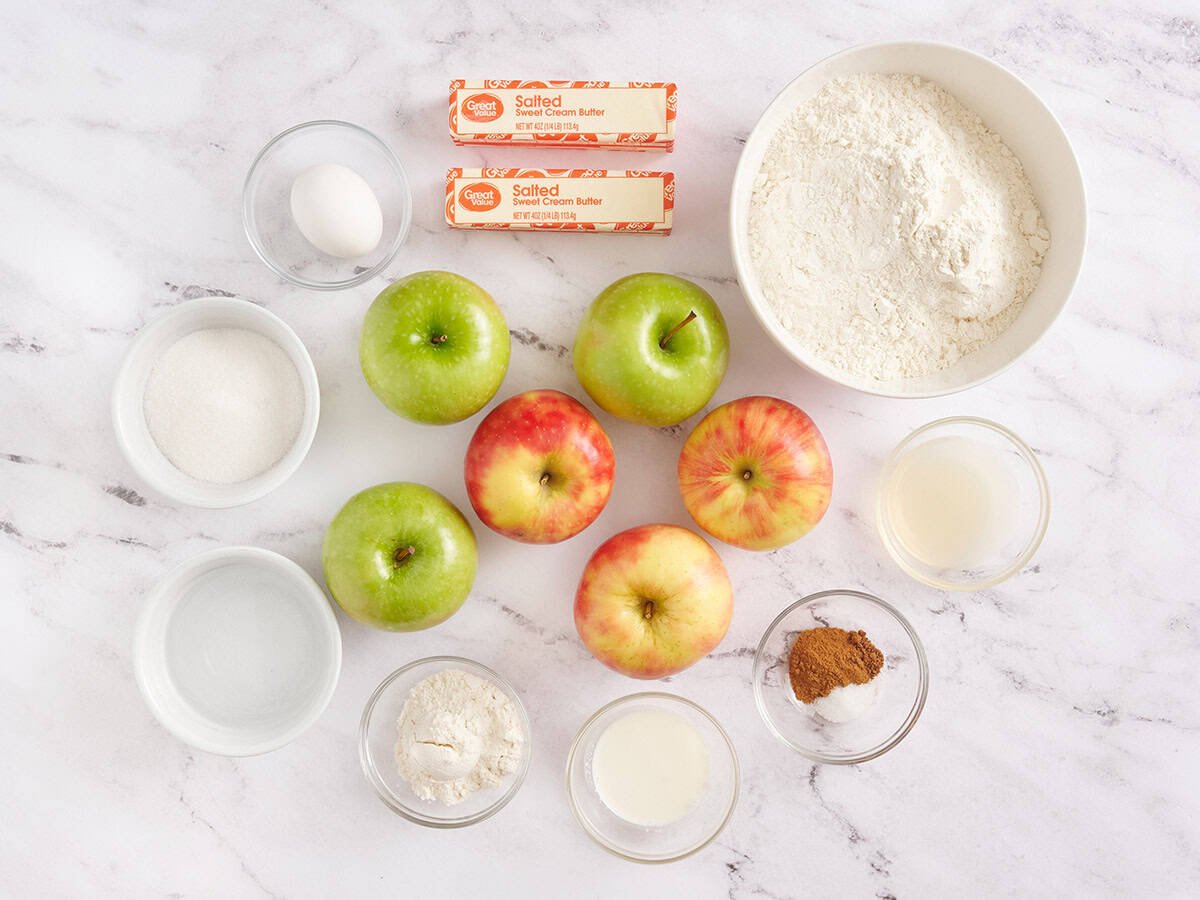
Ingredients
Double Pie Crust*
- 2¾ cups all-purpose flour 350g, plus some for dusting $0.37
- 2 sticks salted butter frozen, (1 cup, ½ lb.) $1.98**
- ½ cup chilled water $0.00***
Apple Pie Filling
- 1 large egg white and yolk separated, $0.25
- 3 Granny Smith apples 3 cups once sliced, (660g uncut) $2.39
- 3 Honey Crisp apples 3 cups once sliced, (625g uncut) $4.49
- 2 Tbsp lemon juice $0.13
- ½ cup granulated sugar 115g, $0.22
- 1 tsp ground cinnamon $0.06
- ¼ tsp salt $0.01
- 3 Tbsp all-purpose flour $0.02
- ⅛ tsp ground nutmeg $0.01
- 1 Tbsp heavy cream $0.08
Instructions
Homemade Pie Crust Instructions
-
Gather and prepare all ingredients. If you're using a store-bought double pie crust, skip to the pie filling directions below.
-
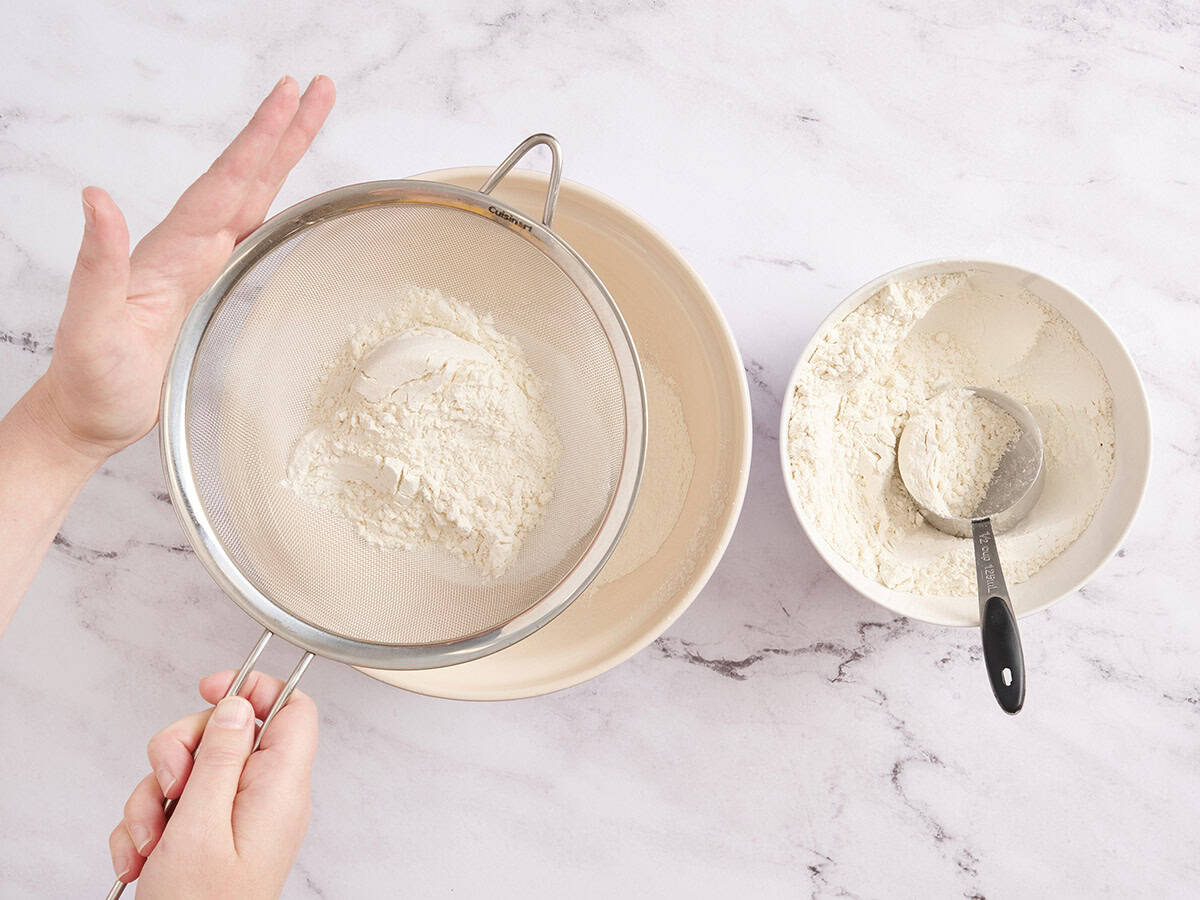
Sift the flour, then spoon 2¾ cups (350 grams) into measuring cups and level off the extra to avoid a dry crust. Add it to a large bowl and place the bowl of flour in the freezer to chill while you grate the butter.
-
Grate the butter sticks on the box grater’s large holes. When the butter becomes difficult to handle, chop the remaining pieces into dice-sized pieces.
-
Add the butter to the flour. Use a spoon to toss the butter and flour. Work quickly until the butter is completely covered in flour and the mixture resembles a shaggy, coarse cornmeal.
-
Spoon 4 tablespoons of chilled, icy water onto the flour/butter mixture. Mix quickly with a fork, incorporating the flour that has gathered at the bottom of the bowl.
-
Continue to add water tablespoon by tablespoon, mixing between each addition, until you can lightly pinch the flour/butter mixture and it holds together in a dough.
-
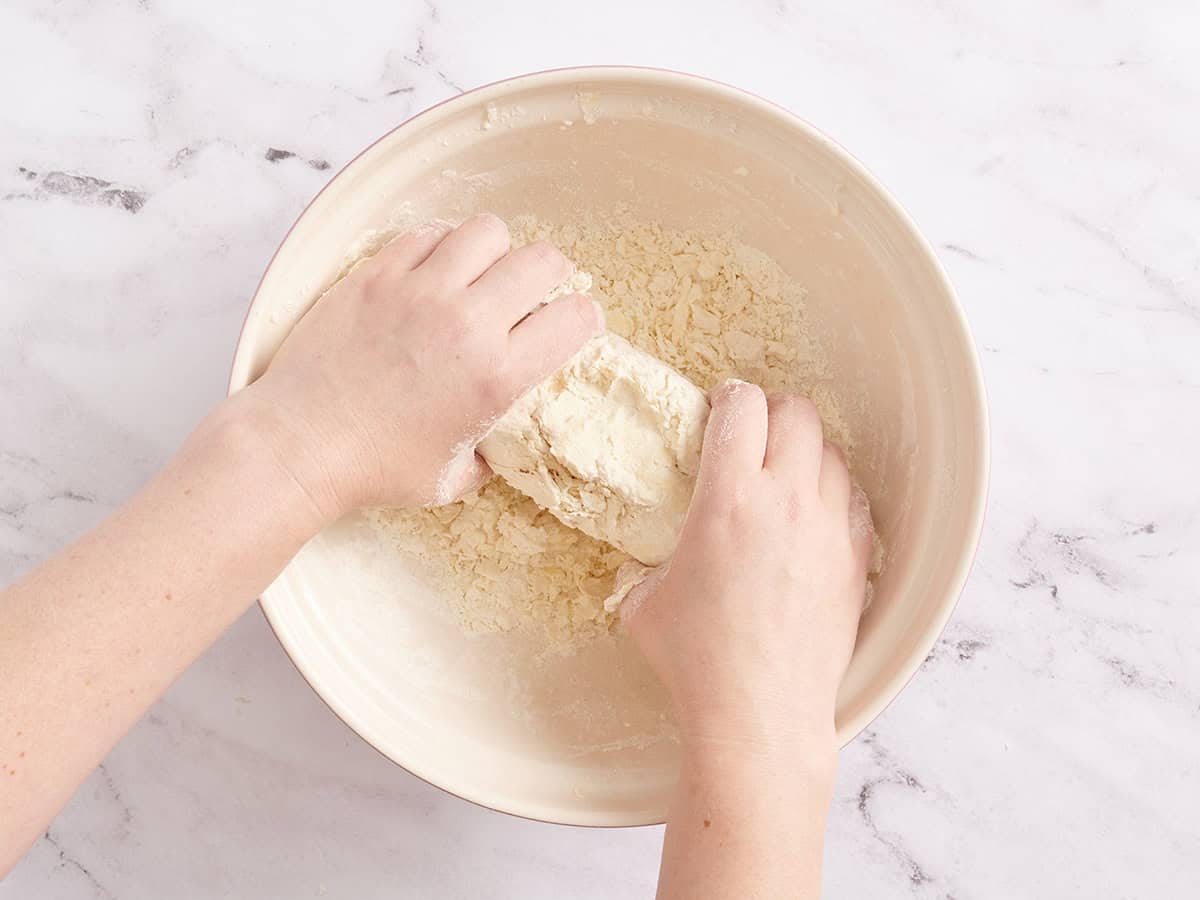
Quickly press the shaggy dough into a ball, working in the flour. Then shape it into a rough 6-inch disc, 3-4 inches thick, on a lightly floured surface. Don’t overmix, it’s ok to be craggy! Smooth dough means it’s been overworked.
-
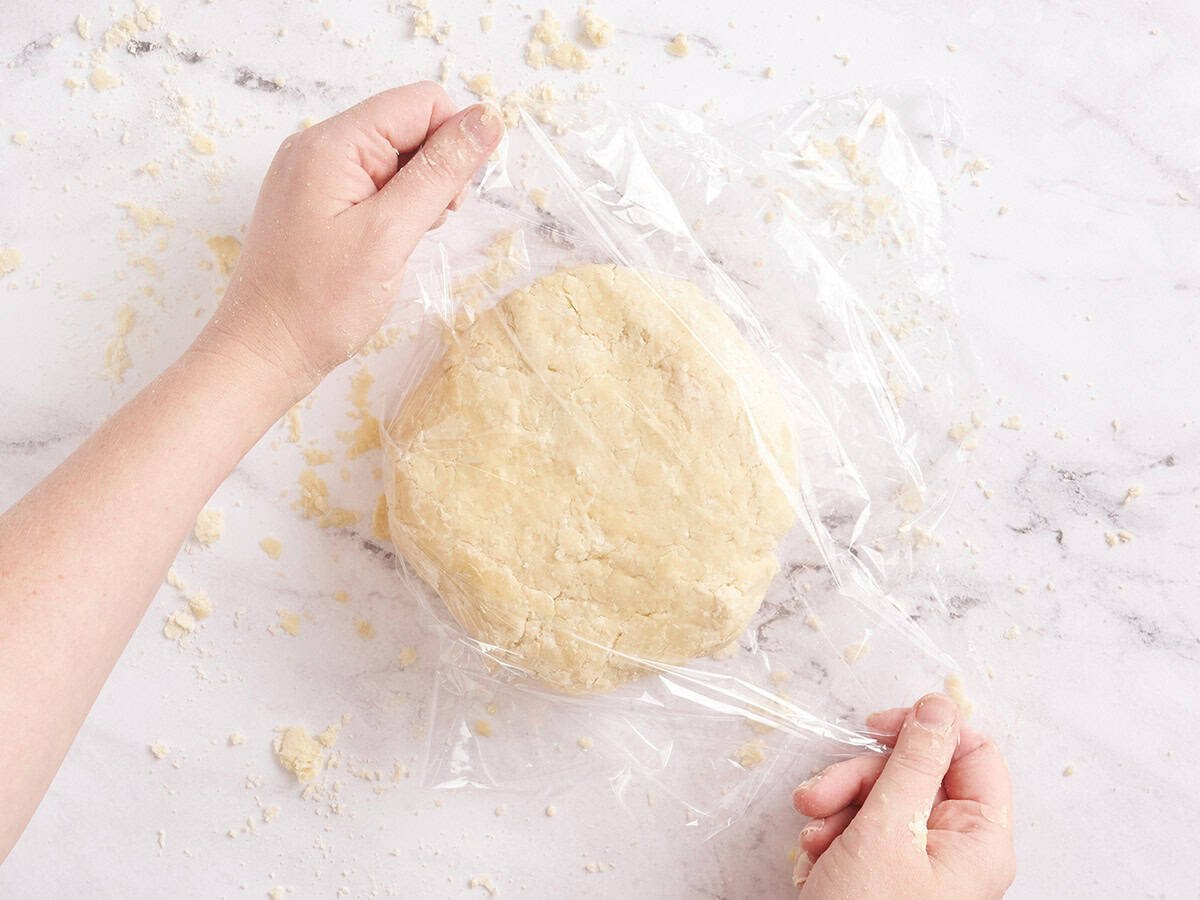
Wrap the disc of dough tightly in plastic wrap. Let it rest in the fridge for at least two hours, preferably overnight.
-
When you’re ready to bake your pie, slice the chilled dough an inch above the center line and shape both halves into a disc.
Pie Filling Instructions
-
To make the apple pie, place a rack in the center of your oven, and top it with two stacked sheet trays (you can also use a pizza stone or large cast iron pan). Preheat the oven to 375°F. Roll out your bottom and top pie crusts to 1/4-inch thickness. You might need to let the pie dough sit for 5 minutes at room temperature if it's too stiff to roll out straight from the fridge. Refrigerate the top crust.
-
Separate the egg white and yolk. Line your pie pan with the rolled-out bottom crust. Use a fork to puncture the bottom crust 9 to 10 times. Beat the egg white and brush the bottom crust lightly with it. Refrigerate the crust-lined pie pan.****
-
Peel and slice the apples into 1/4-inch-thick slices until you have 6 cups. Then place them in a colander and toss them with lemon juice.
-
Place the colander in a large saucepan. Mix the sugar, cinnamon, salt, flour, and nutmeg. Sprinkle the apples with the sugar mixture and incorporate thoroughly.
-
Allow the apples to marinate in the sugar and spices for half an hour. They will release their juices into the saucepan.
-
Once the apples have released their juices, remove the colander with the apples, and simmer the juices in the pan over medium heat until they reduce into a caramel, about 5 minutes.
-
Add the sliced apples to the pan and cook with the caramel until slightly softened, about 5 minutes. Let them cool for about 10 minutes.
-
Once the apples have cooled, remove the pie pan and the top crust from the refrigerator. Add the apple slices to the crust-lined pie pan.
-
Cover the apples with the top crust. Fold the top crust under the edges of the bottom crust and pinch the crusts together.
-
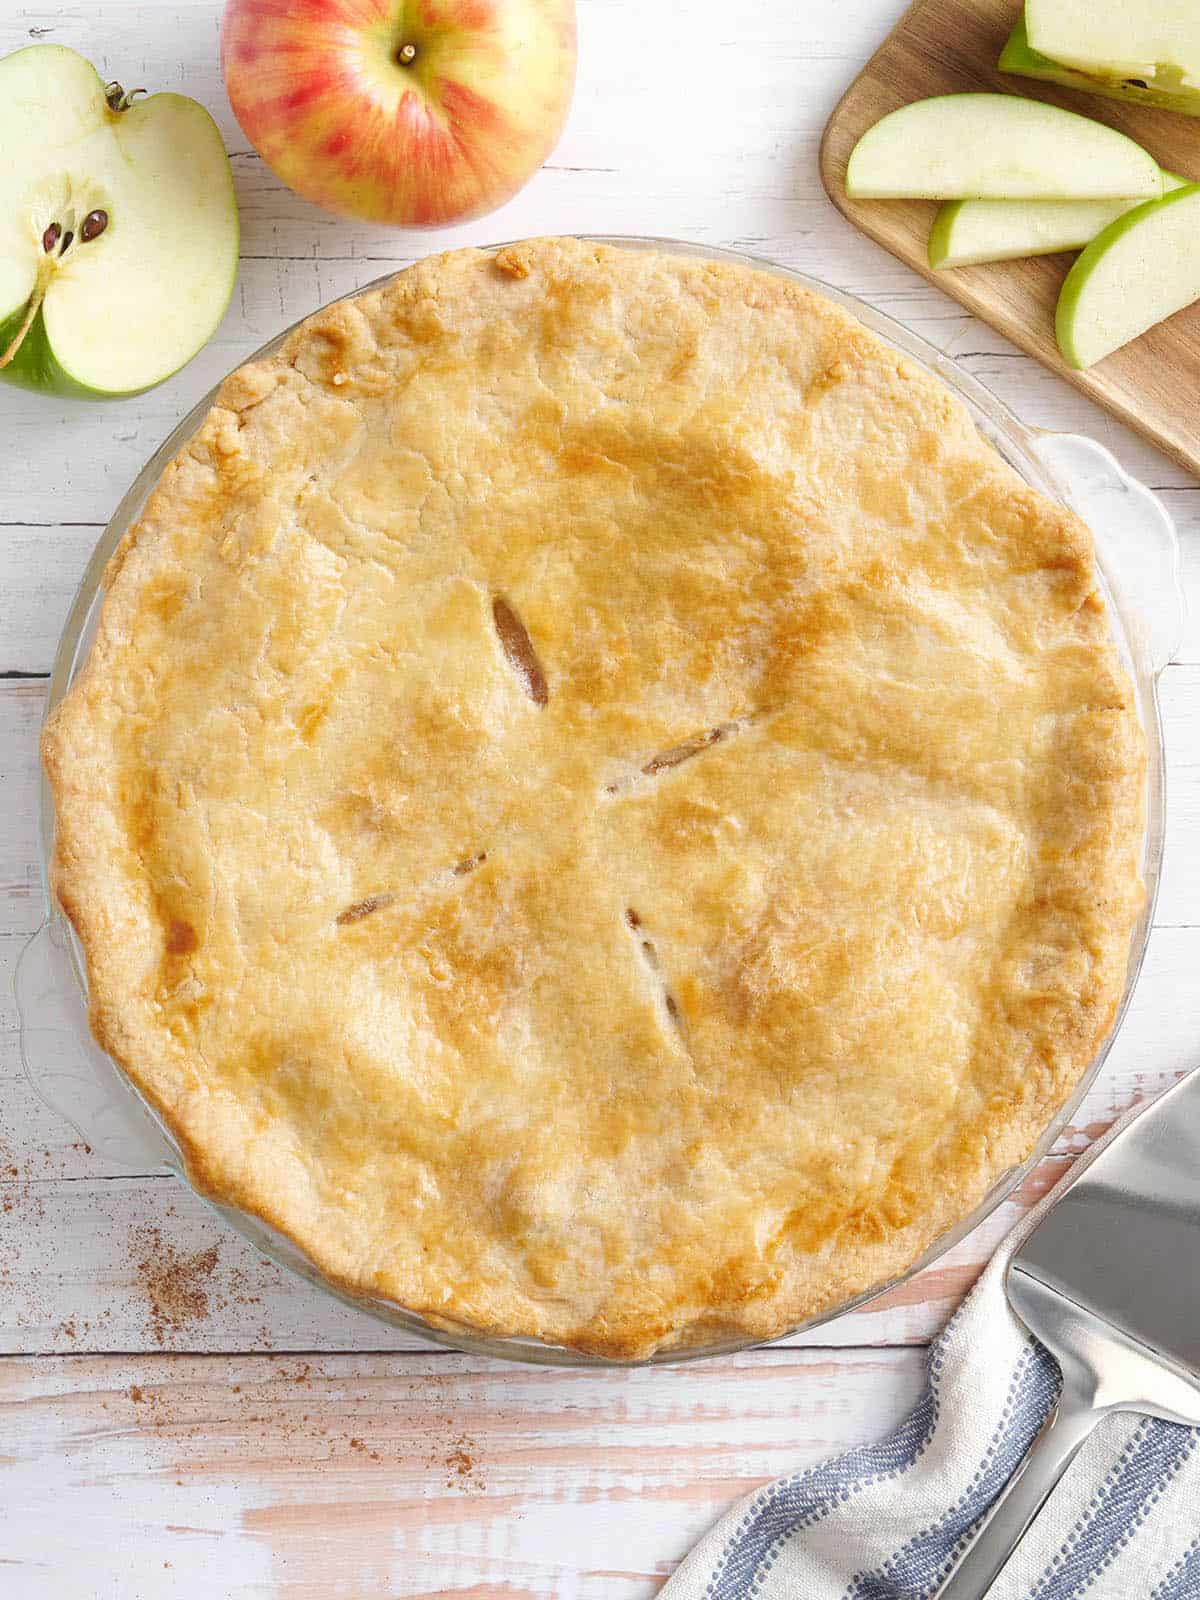
Flute the crusts, then slice steam vents into the top crust. Beat the egg yolk and cream together, and brush the top crust with the egg wash.
-
Place the pie pan on top of your sheet trays and bake for 45 minutes, or until the top crust is golden brown and the pie’s juices are bubbling.
-
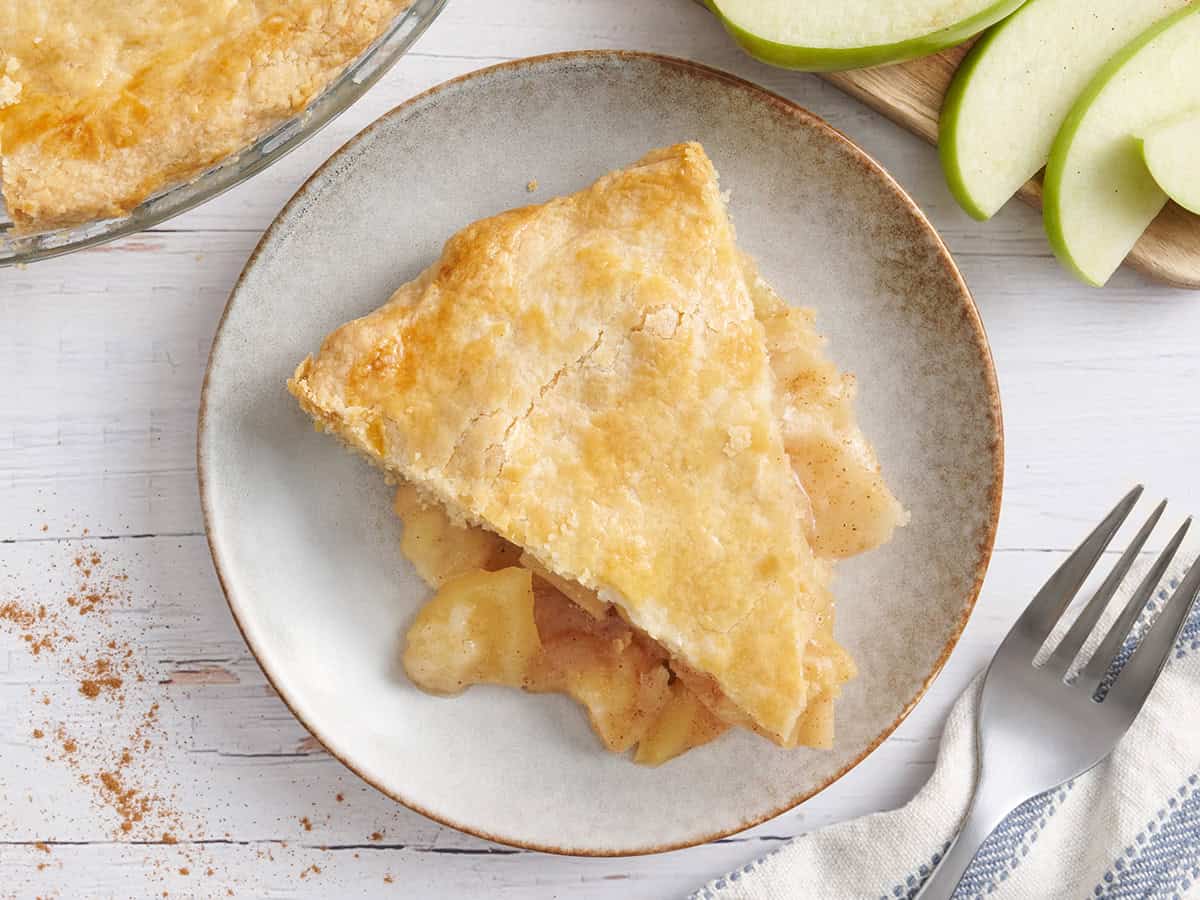
Cool the pie for at least 30 minutes before slicing, but preferably for an hour to allow the filling to solidify.
See how we calculate recipe costs here.
Video
Notes
Nutrition
How to Make Apple Pie Step-by-Step Photos
Gather all of your ingredients.
Make the pie crust: If you’re making my homemade pie crust, start by sifting the flour to remove any clumps.
If you’re using a store-bought double crust, skip to step 10 (preheating the oven and rolling out the top and bottom crusts).
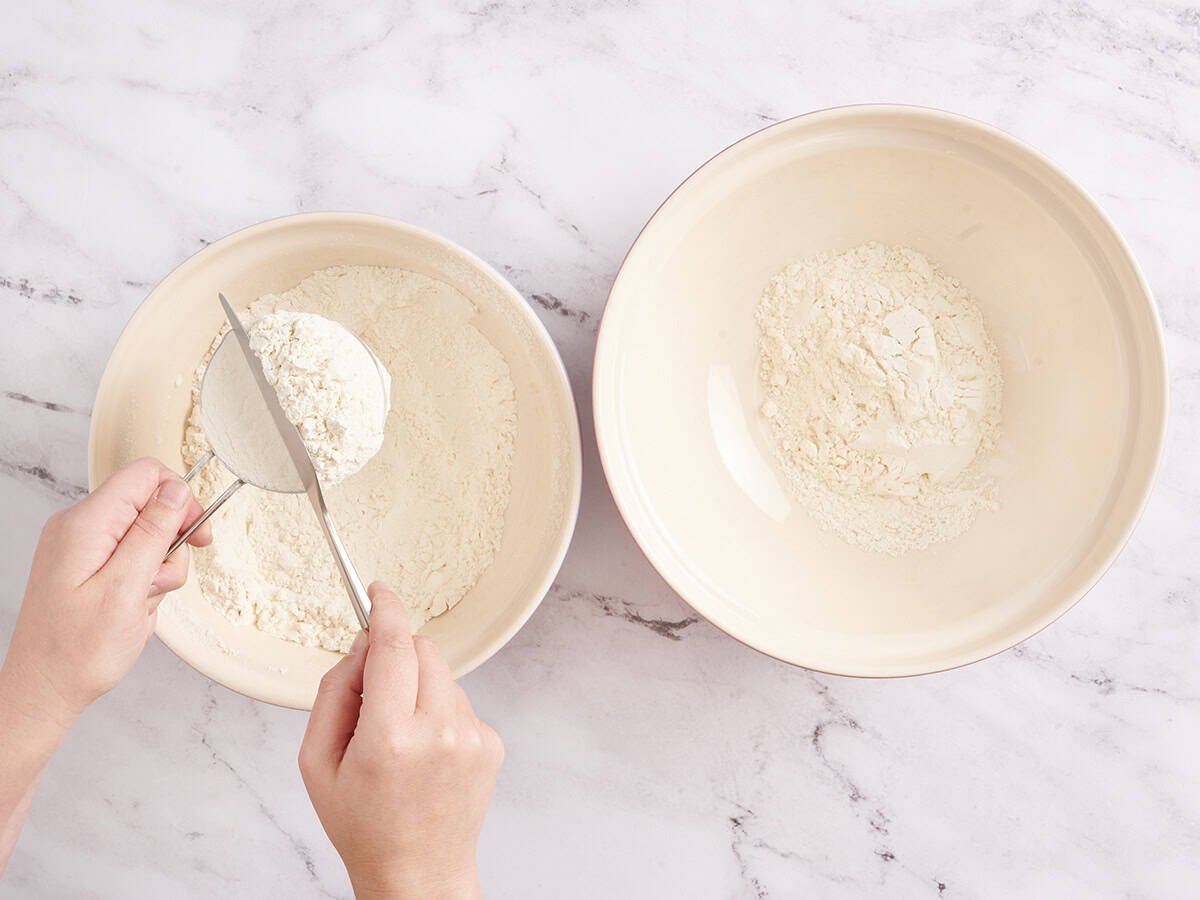
After sifting, spoon 2¾ cups (350 grams) into measuring cups and then level off the top with a knife to avoid accidentally using too much flour, which can make the crust dry. Pop the measured flour into a bowl and place the bowl in the freezer to chill while you prep the butter.

Grate the butter: Grate 2 sticks frozen salted butter using the large holes on a box grater. Once you’ve grated most of the butter and it becomes difficult to handle, I just chop the remaining pieces into a small dice.
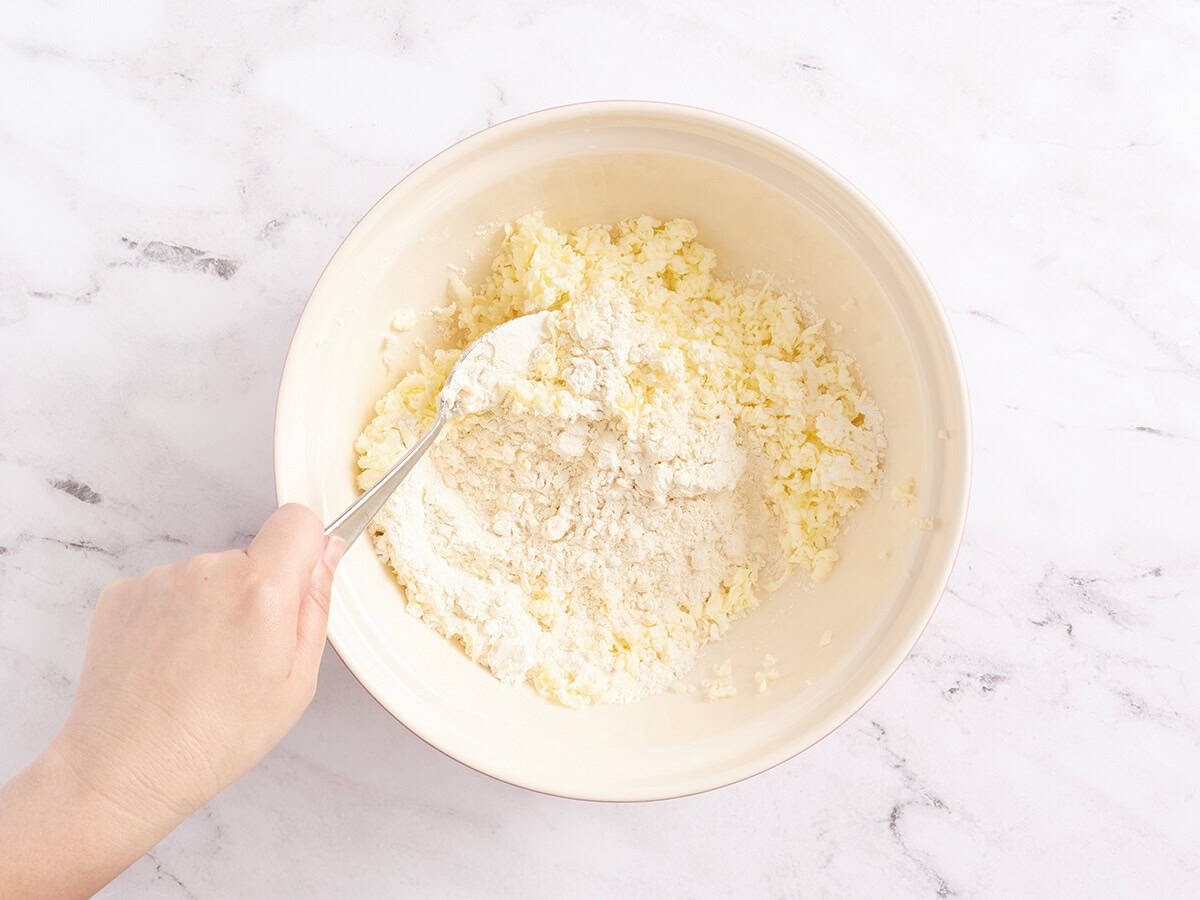
Remove the bowl of flour from the freezer and add the grated butter. Use a spoon (not your hands to avoid warming the butter) to toss the butter and flour together. Be sure to work quickly until the butter is covered in flour and resembles a shaggy, coarse cornmeal.
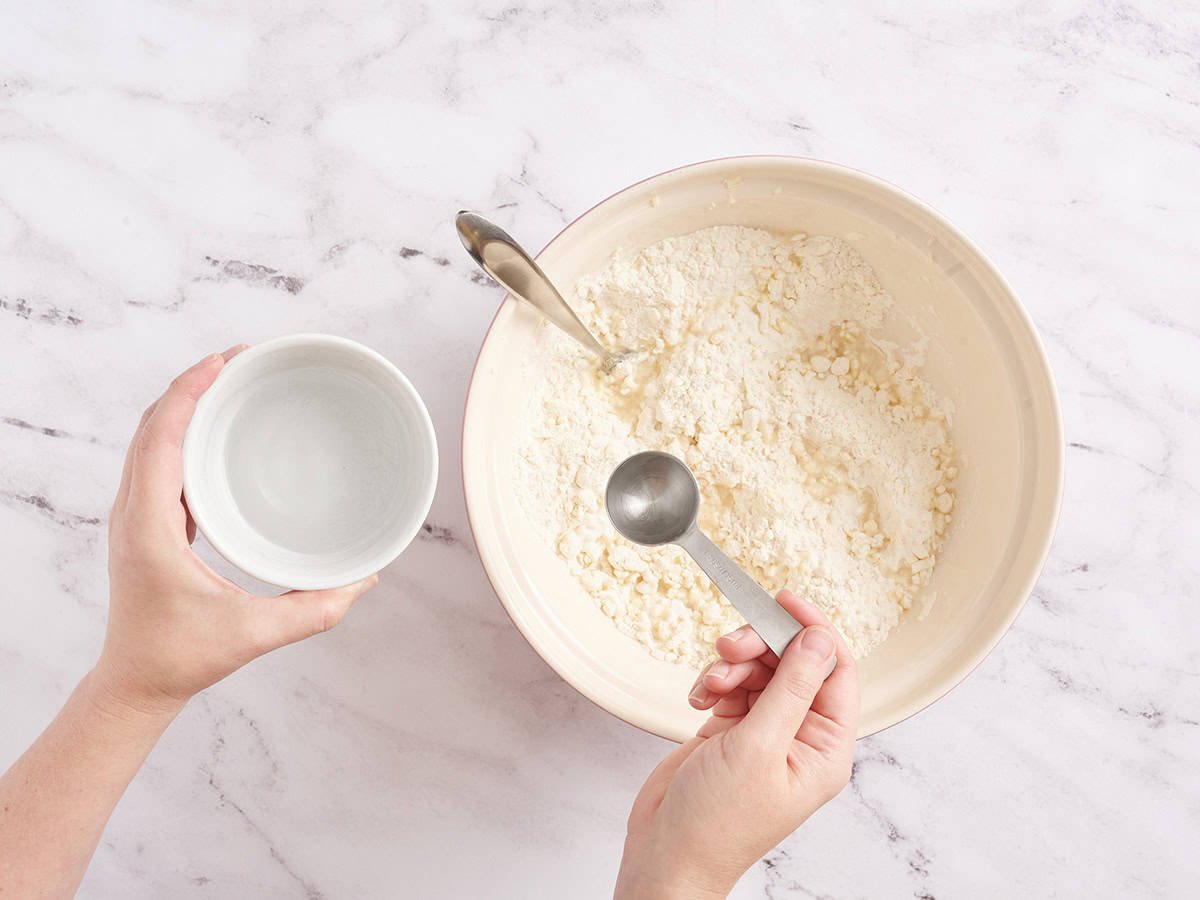
Add 4 Tbsp of chilled, icy water to the butter and flour mixture. Mix quickly with a fork, scraping up the flour that has gathered at the bottom of the bowl.
Keep adding 1 Tbsp of water at a time, mixing between each addition, until you can lightly pinch the flour-butter mix together and it holds in a dough.
Quickly form the shaggy dough into a ball, working in any leftover flour in the bowl. On a lightly floured surface, shape the dough ball into a rough 6-inch disc (3-4 inches thick). Don’t be tempted to overmix! It’s supposed to be a craggy dough at this point. A smooth dough means it’s been overworked.
Wrap the dough disc tightly in plastic wrap and store it in the fridge for at least 2 hours, or ideally overnight.
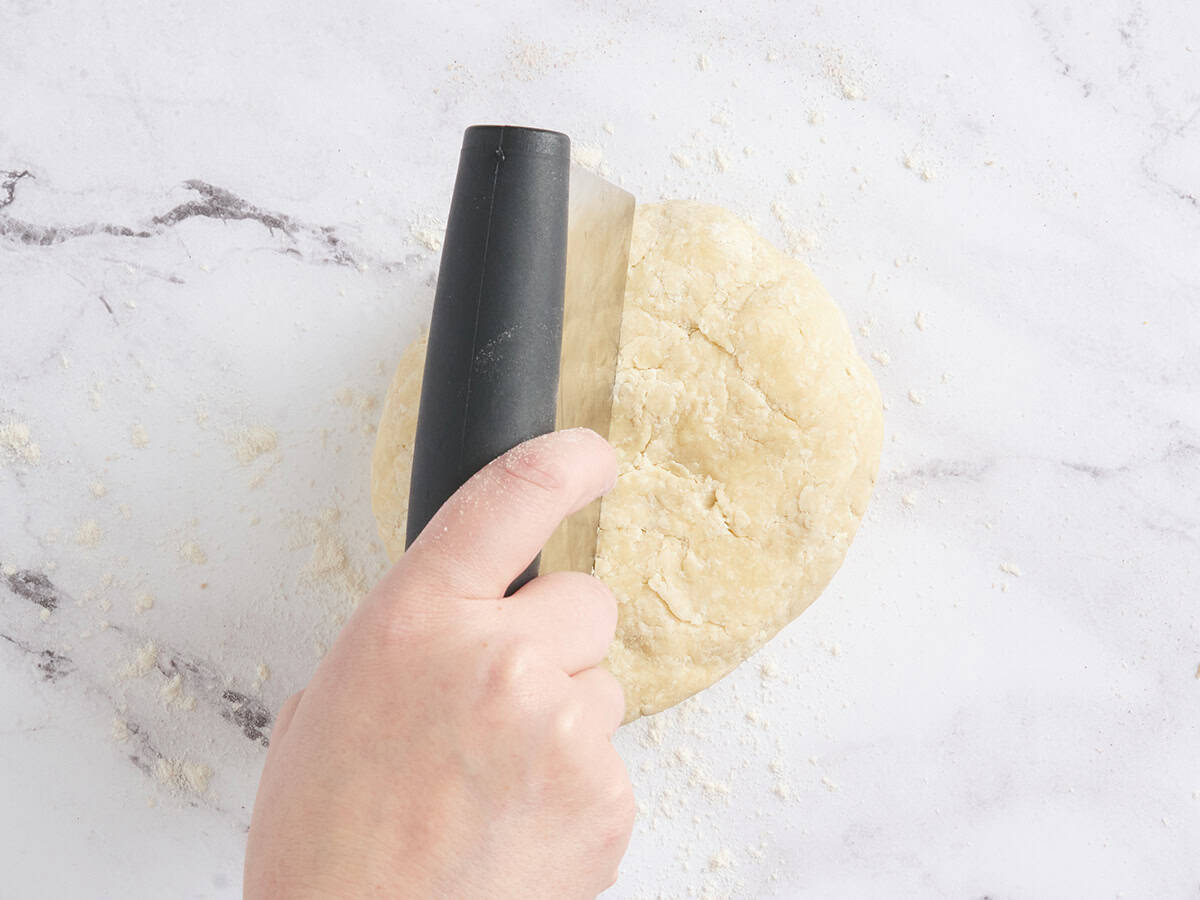
When you’re ready to bake your pie, slice the chilled dough an inch above the center line and shape both halves into a disc.
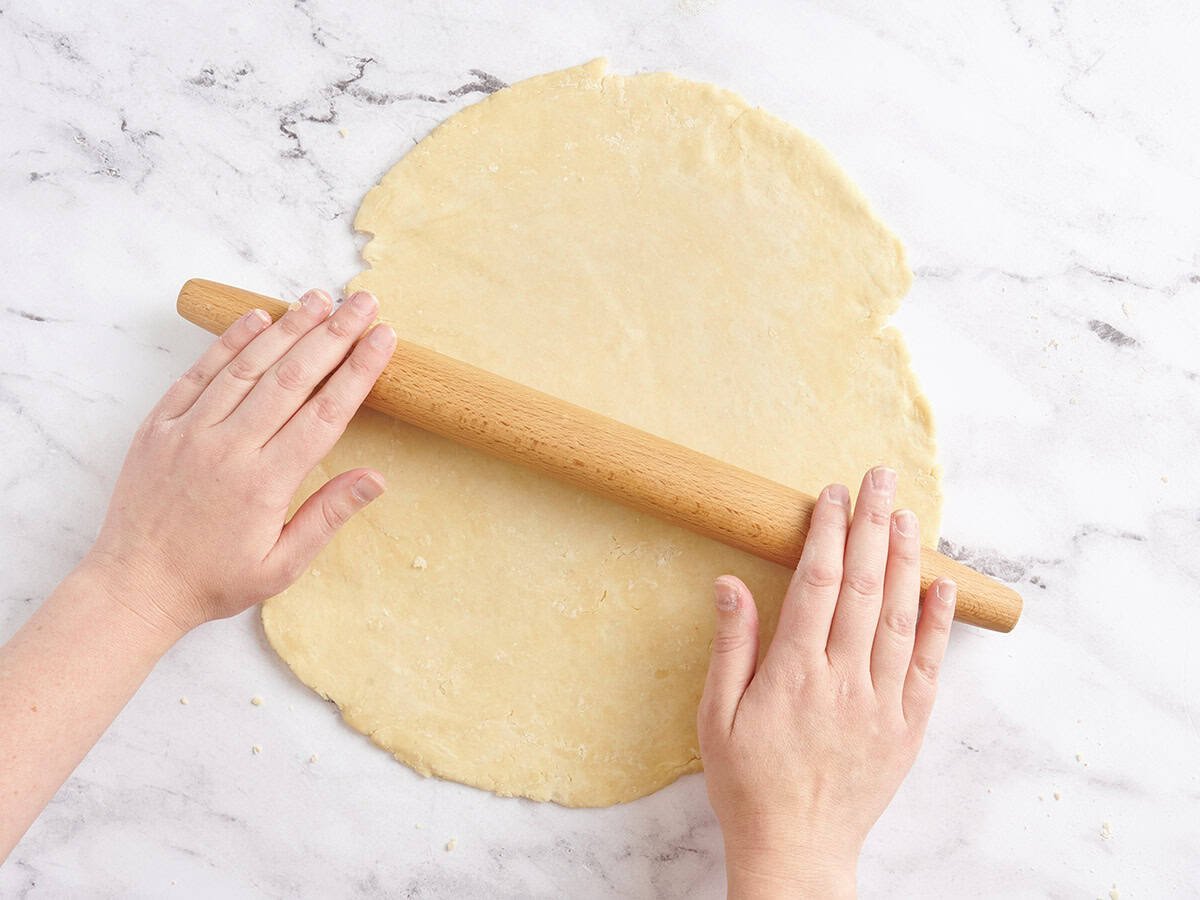
Prep the crusts: Place a rack in the center of your oven, and top it with two stacked sheet trays (or a pizza stone or large cast iron pan). Preheat the oven to 375°F. Roll out your bottom and top pie crusts to 1/4 inch thickness (you might need to let the pie dough sit for 5 minutes at room temperature if it’s too stiff to roll out straight from the fridge). Place the rolled out top crust into the fridge for now.
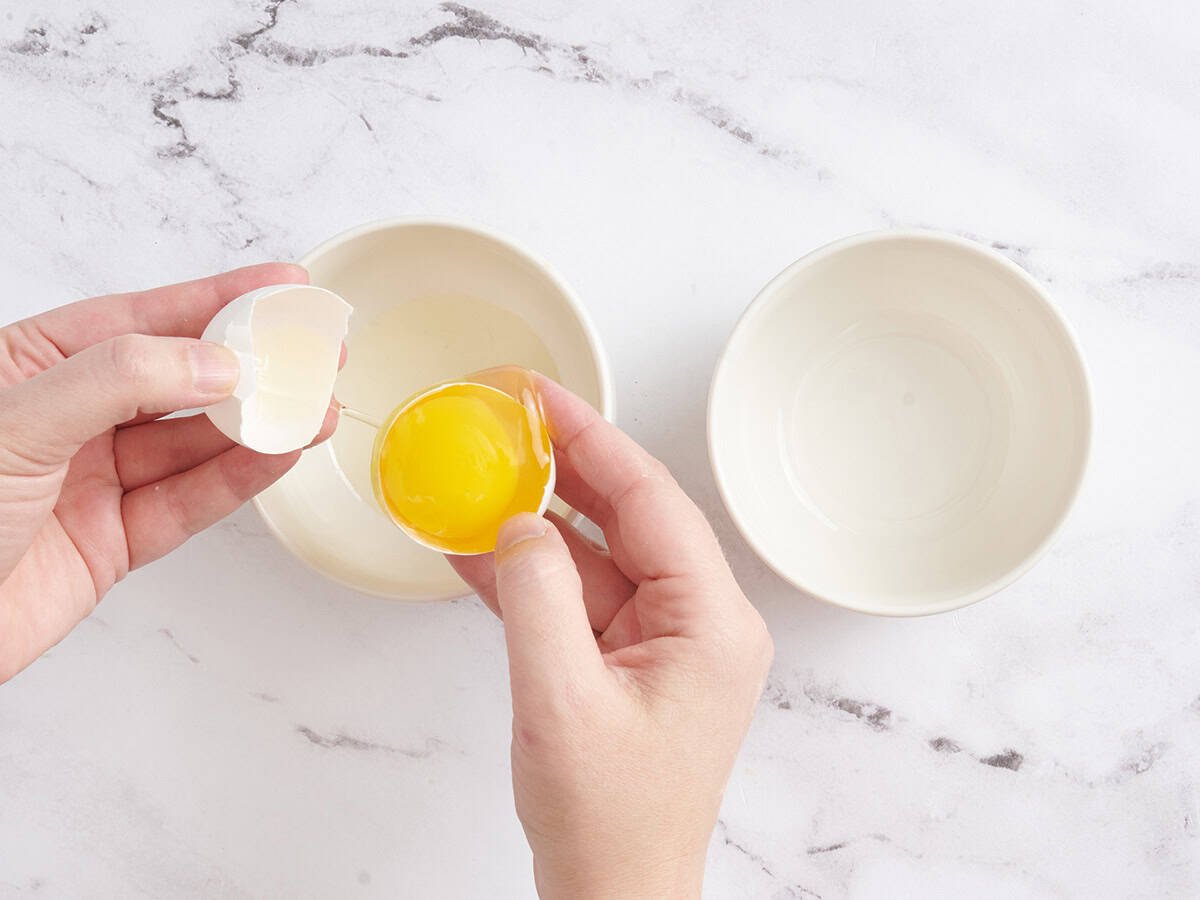
Brush the pie crust: Separate the egg yolk and white from 1 large egg, and line your pie pan with the rolled-out bottom crust. Puncture the bottom crust with a fork 9-10 times. Place the egg yolk to one side.

Beat the egg white and brush the bottom crust with a very thin layer of egg white. Place the bottom-crust-lined pan in the fridge while you make the filling.
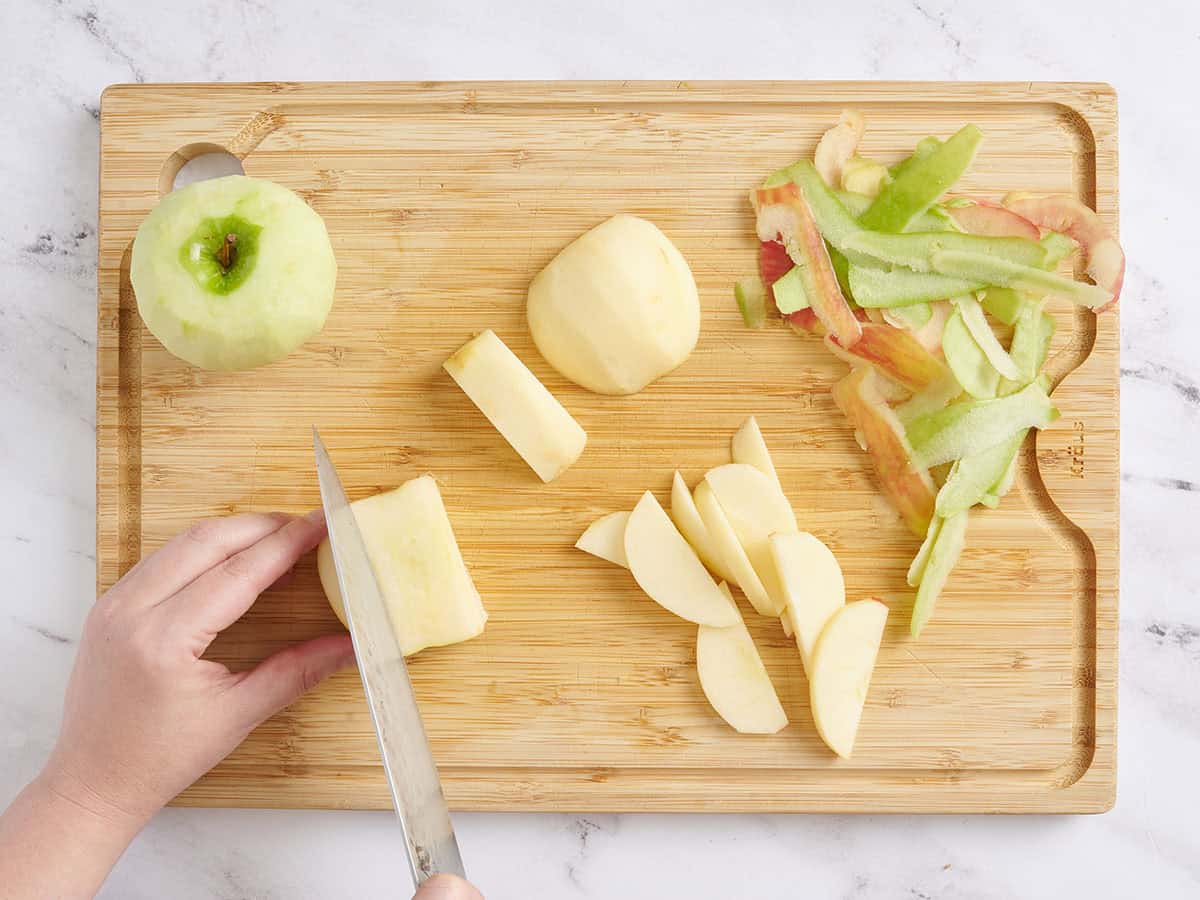
Slice the apples: Peel 3 Granny Smith apples and 3 Honey Crisp apples. Then slice them into 1/4-inch-thick slices until you have 6 cups total.
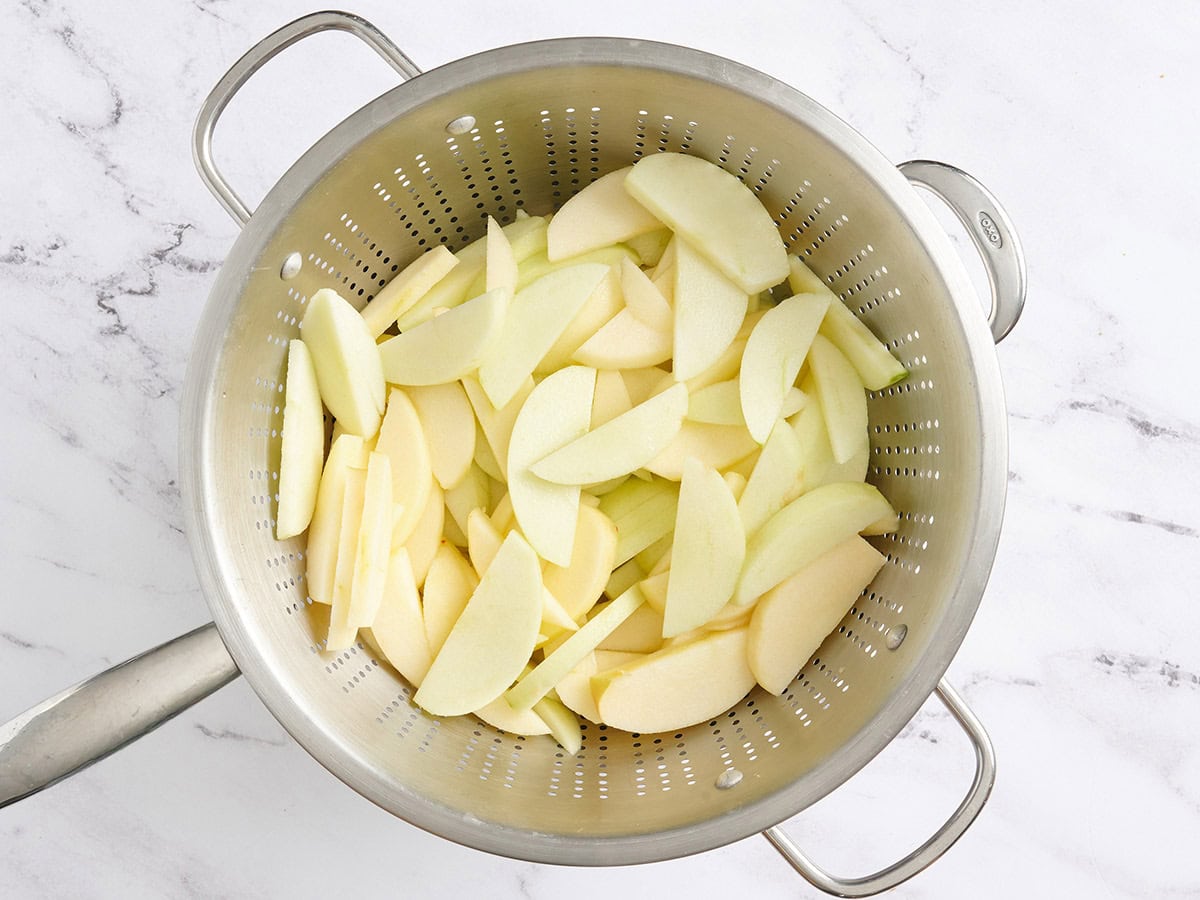
Place a colander over a large saucepan. Add the 6 cups of sliced apples to the colander and toss them with 2 Tbsp lemon juice.
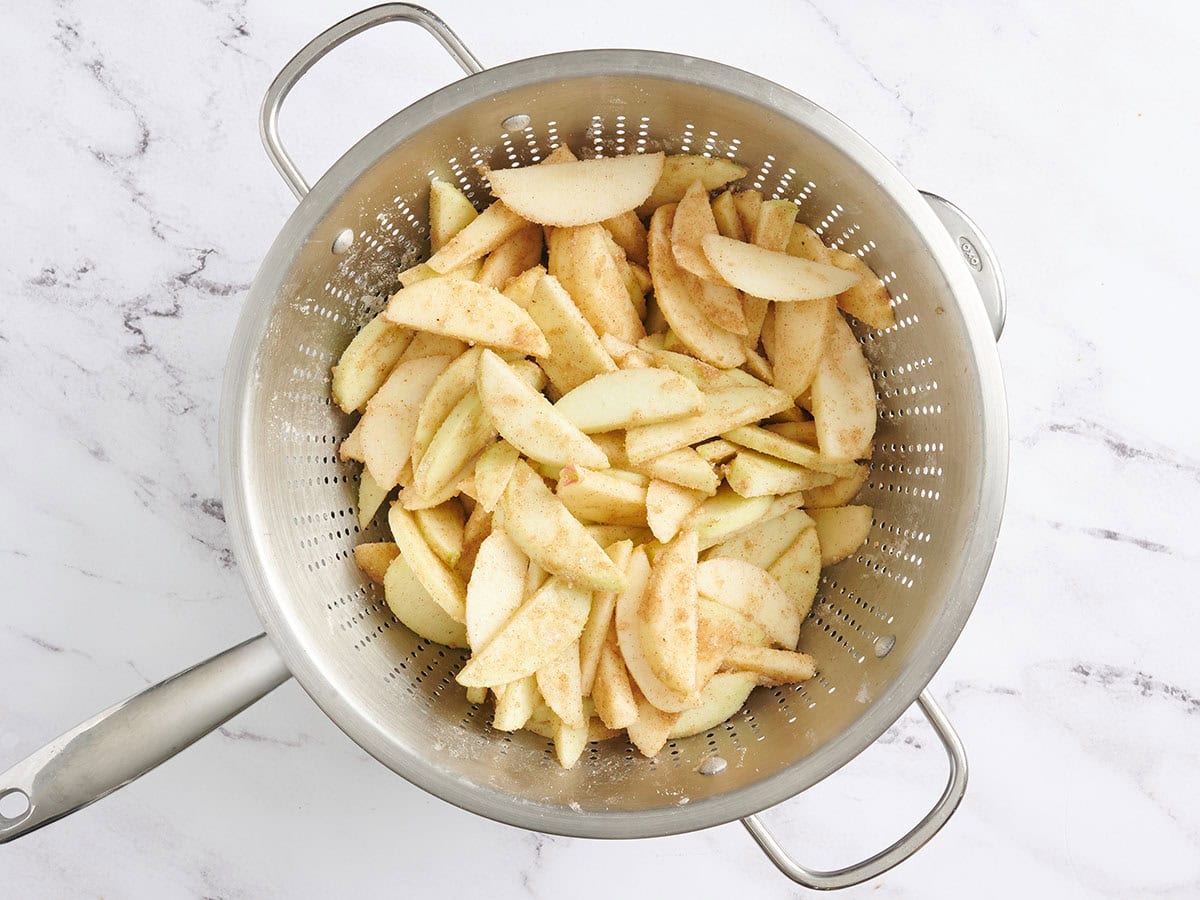
Marinate the apples: Mix the ½ cup granulated sugar, 1 tsp cinnamon, ¼ tsp salt, 3 Tbsp flour, and ⅛ tsp nutmeg together in a small bowl. Sprinkle the apples with the sugar mixture and incorporate thoroughly.
Let the apples marinate in the sugar and spices for half an hour. They will release their juices into the saucepan under the colander.
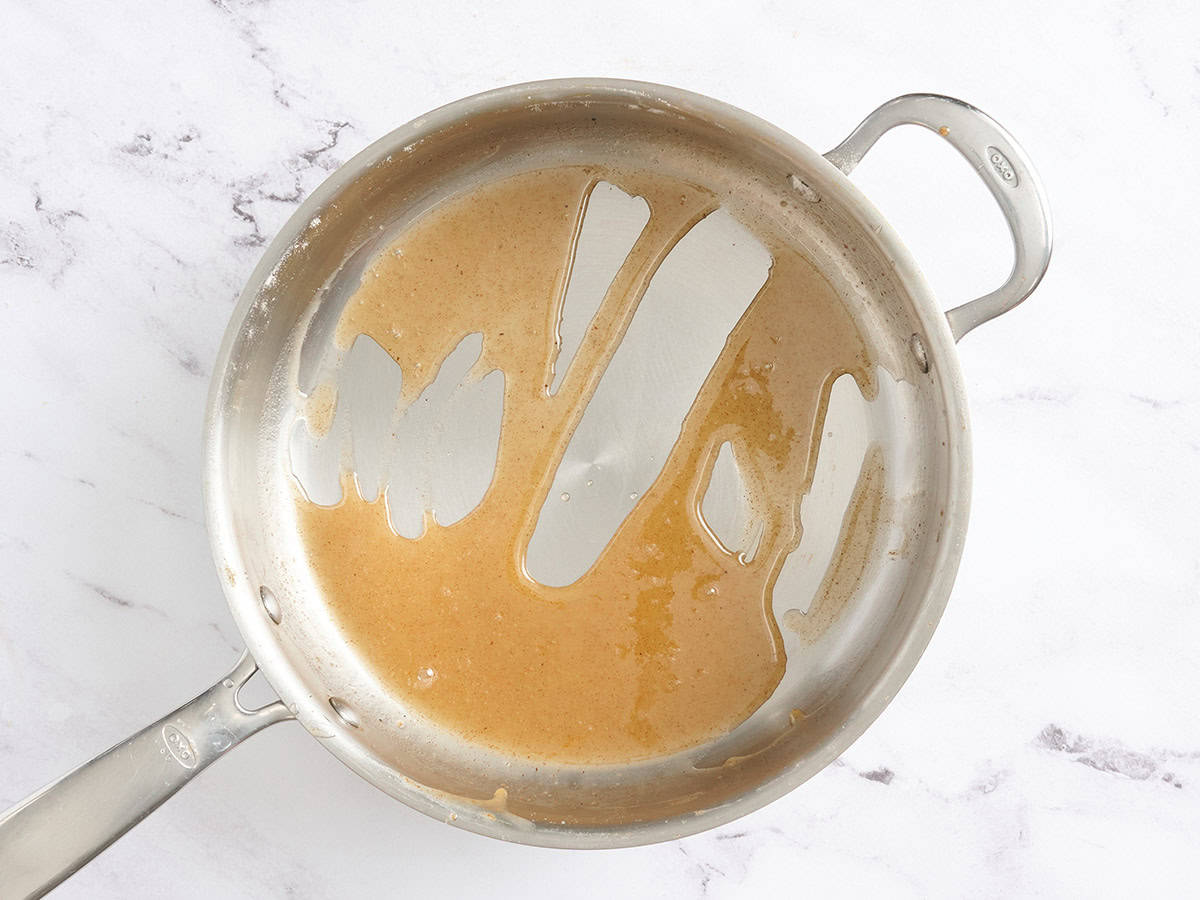
Make the apple caramel sauce: After the apples have released their juices into the pan, remove the colander and the apples and place the pan with the juices over medium heat. Cook down the apple juices until a caramel forms, about 5 minutes.
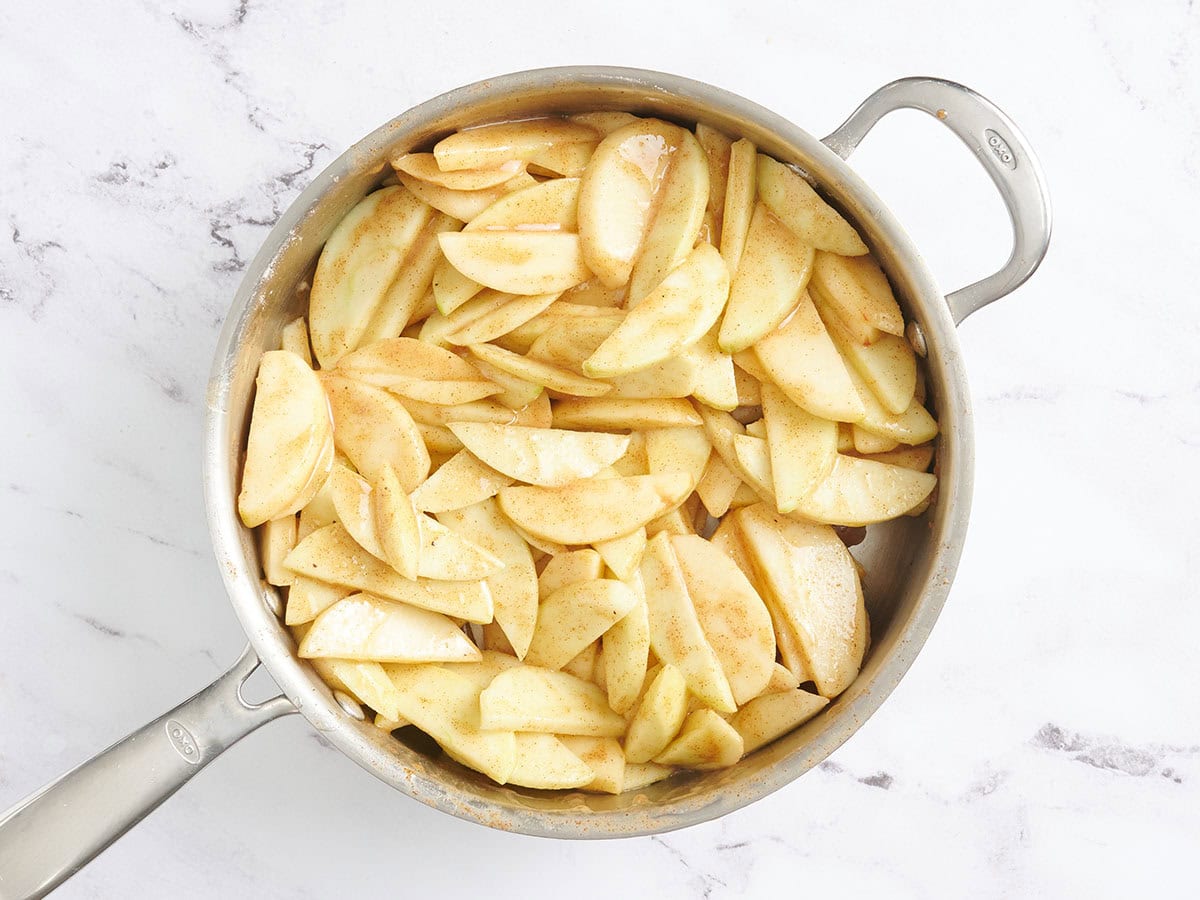
Make the filling: Add the sliced apples to the pan and cook with the caramel until slightly softened, about 5 more minutes. Remove the pans from the heat and let the apples cool for about 10 minutes.
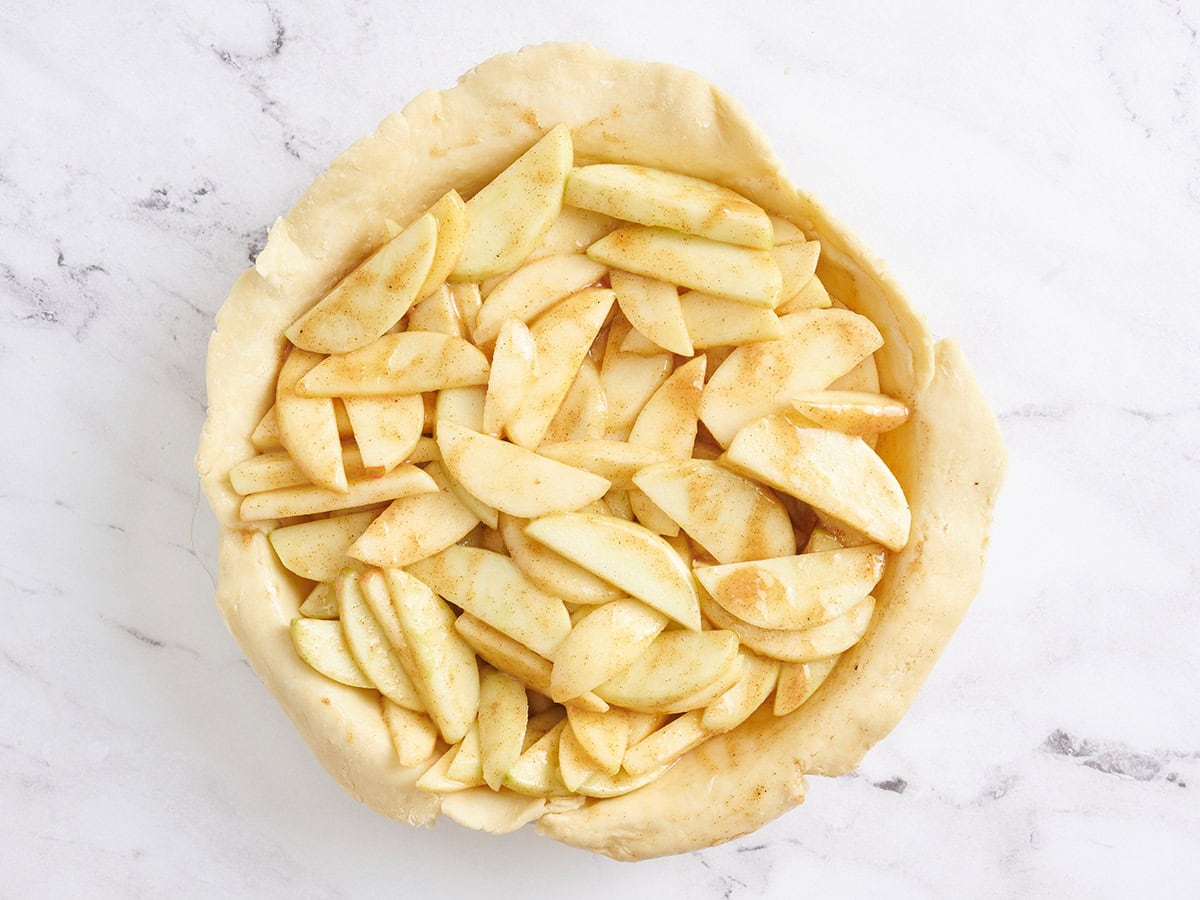
Assemble the pie: When the apples have cooled for 10 minutes, remove the pie pan and the top crust from the refrigerator. Pour the softened apple slices into the crust-lined pie pan.
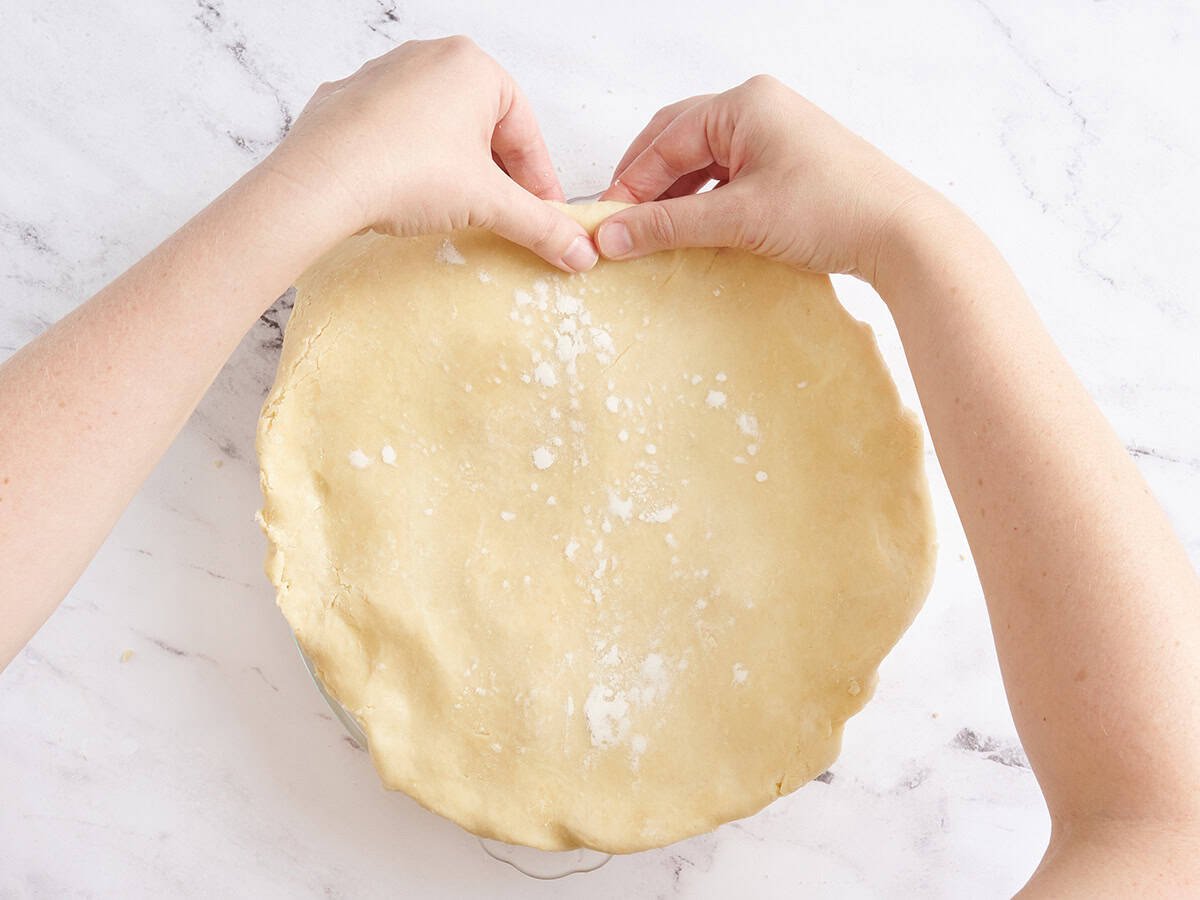
Place the rolled-out top crust over the apples. Use your fingers to fold the top crust under the edges of the bottom crust. Pinch the edges together to create a seal.
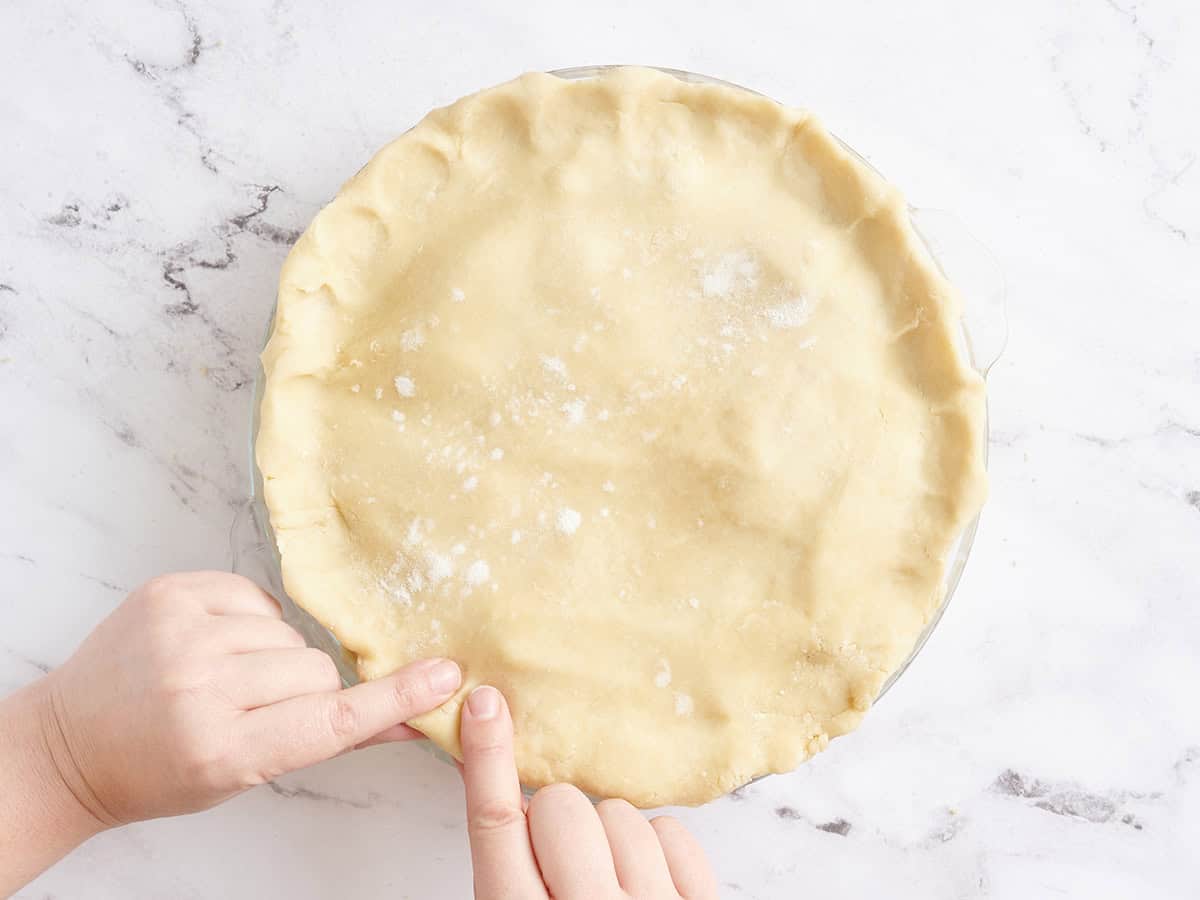
Now press around the edges with your fingers to flute the crusts. It doesn’t have to be perfect or fancy!
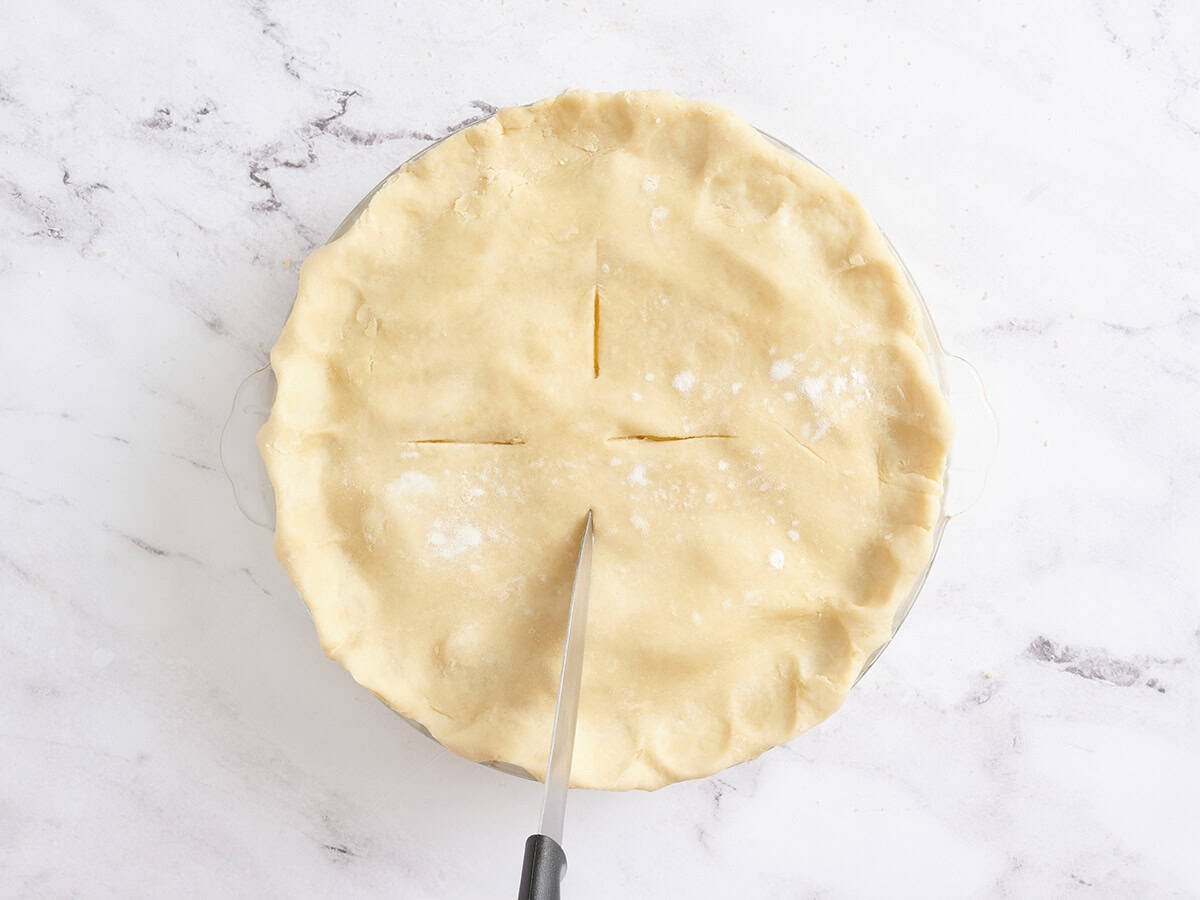
Use a knife to slice four steam vents into the top crust (carefully, avoid slicing too far down into the pie!)
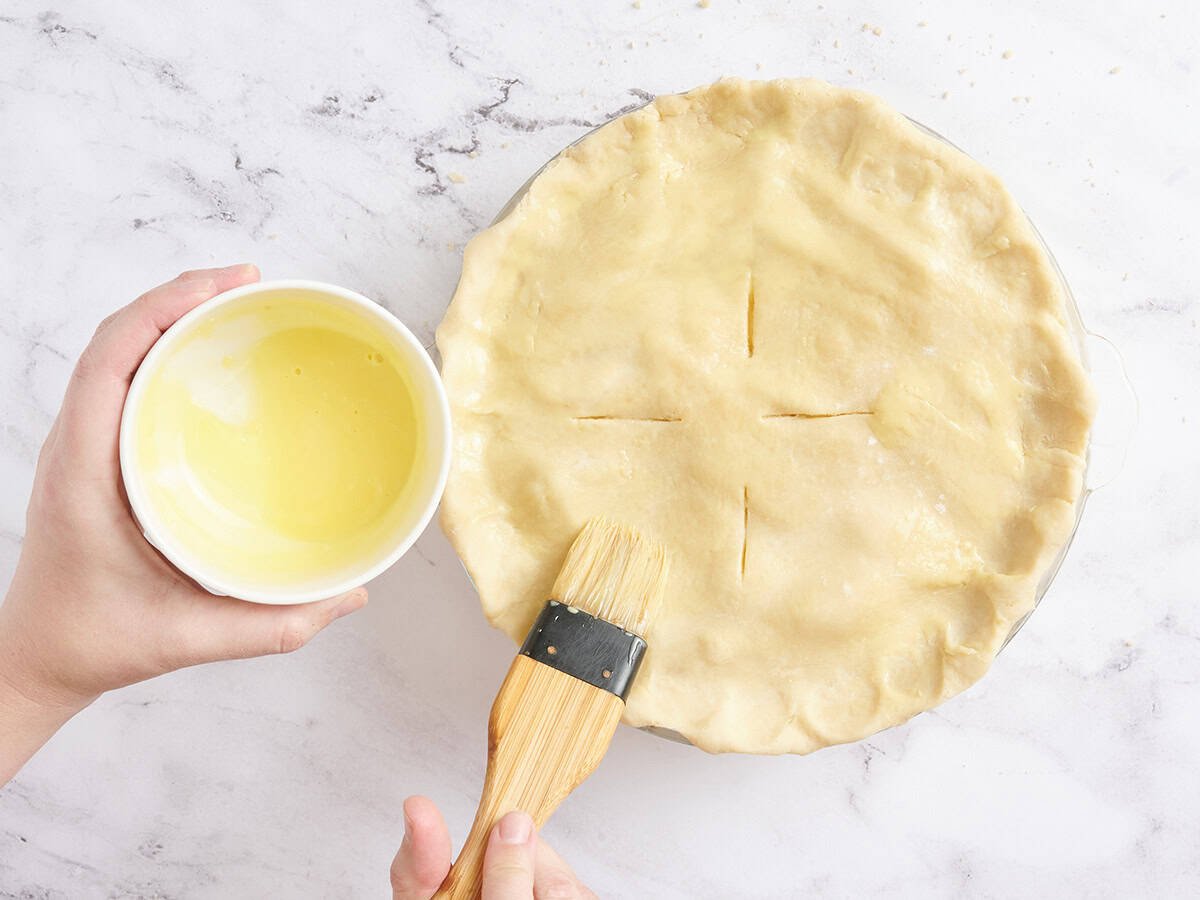
Add 1 Tbsp heavy cream to your separated egg yolk and beat them together. Brush the yolk-cream mixture over the top crust. This will help create a nice, shiny, golden finish once baked.
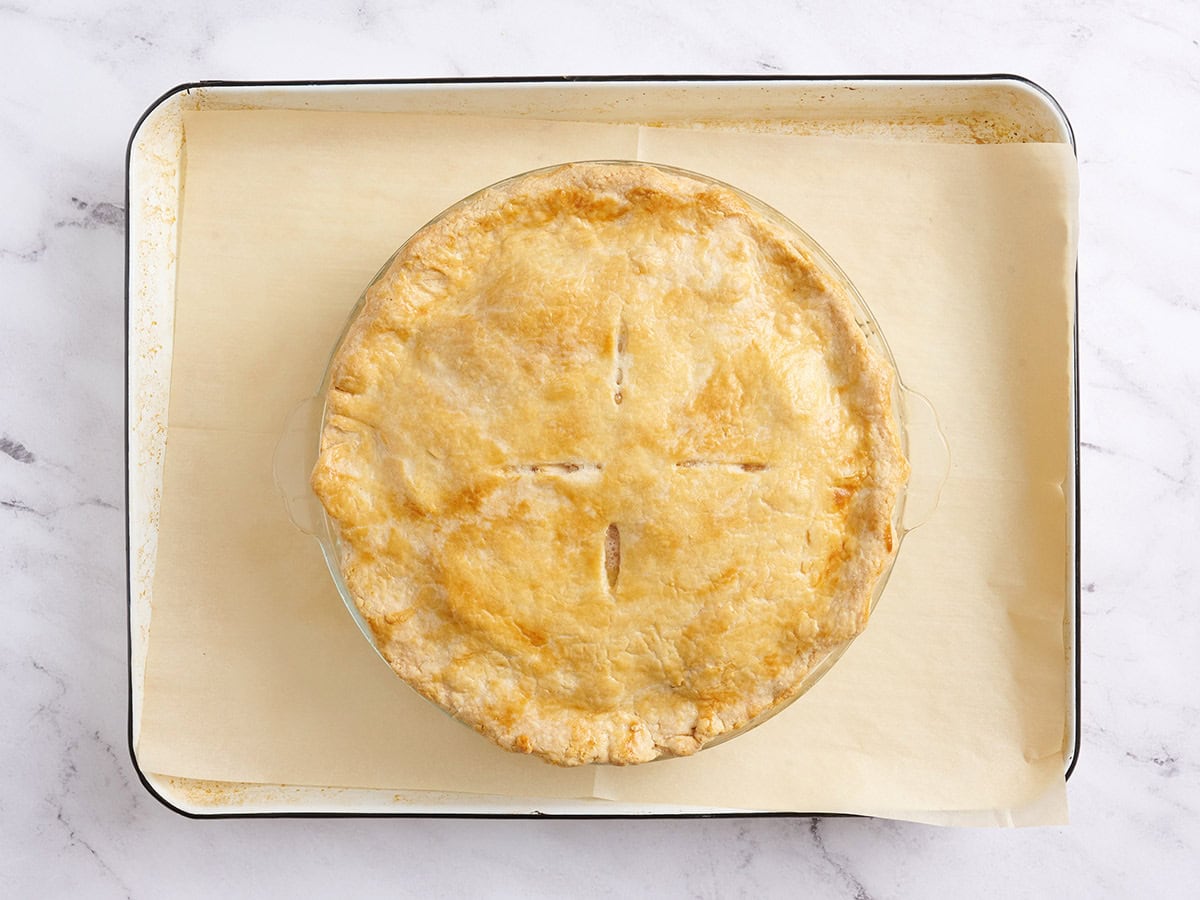
Bake the pie: Place the pie pan on top of your sheet trays in the preheated oven and bake for 45 minutes, or until the top crust is golden brown and the apple juices are bubbling.
Let your homemade apple pie cool for at least 30 minutes before slicing, but preferably an hour to allow the filling to solidify. Enjoy!
How to Avoid a Soggy Bottom
Avoiding a soggy bottom takes more than using the proper crust. I cover all of these tips in my recipe above, but here’s a quick cheat-sheet for you to ensure your apple pie has the crispiest bottom crust EVER:
- Draw out your apples’ natural juices by sprinkling them with sugar and spices. Then cook the juices until they transform into a caramel.
- Cook the apple slices in the caramel for a few minutes, further reducing the liquids and concentrating the flavors.
- Seal your bottom pie crust by brushing it with a small amount of beaten egg white.
- Bake your pie on a double layer of sheet pans, a pizza stone, baking steel, or in a large cast iron pan. These tools trap heat and help cook your bottom crust faster, sealing it, so the juices don’t have time to soak in. Baking your pie in a second pan also has the added benefit of trapping any overflow of juices, so your oven doesn’t start to smoke and set off your alarms.
Storage & Reheating
You can store your baked apple pie covered at room temperature for up to 2 days, or in the fridge for up to a week, per the USDA. However, I recommend enjoying your pie within 3-4 days for the best flavor and texture! Reheat leftovers in the oven at 375°F to crisp the crust back up.
You can also freeze the whole pie or slices for up to 3 months. Be sure to wrap leftovers tightly in plastic wrap and then place them into a freezer-safe container or bag before freezing. Let them thaw in the fridge overnight before reheating.


Our Apple Pie recipe was originally published 10/17/22. It was retested, reworked, and republished to be better than ever 10/29/25.
The post Apple Pie appeared first on Budget Bytes.
from Budget Bytes https://ift.tt/qOFMzwC